Thursday, April 28, 2011

No Sew Valance {And a Beautiful New Kitchen}

***NOTE: I have noticed that many of you have fewed this post by a Google Search. I am very excited for you to be here. Please leave a comment about your project or a link to your finished product. I would love to hear from you. ***

I don't sew.
Don't know how, have tried before and failed, and most importantly, don't have a sewing machine.

I knew I would need a valance for the kitchen but I wasn't sure what I was going to do. I was trying to get by doing everything as cheap as possible, and also trying to make as much as possible.

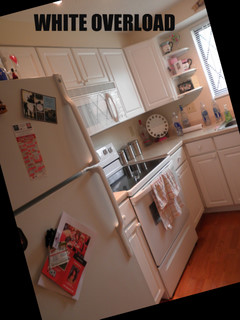
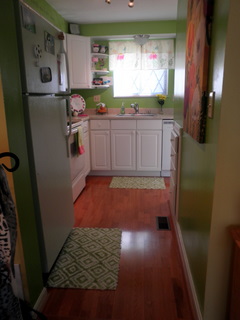
Here is the Before Pictures


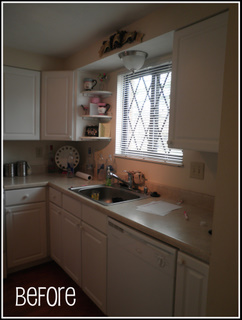
Sorry Sis- But it's true.
First thing this place needed was some COLOR!!!
My sister is to vibrant of a person to be living with all white
(don't get me wrong I love decorating with white but it just wasn't for her)
Now, onto the Valance
My momma found these Flour Sack towels at TJMaxx for $1.99 a piece. I went and purchased Stitch Witchery from JoAnns (for the sewing impaired) and it was super easy. Anyone can do this!

I simply lined up the two towels where I wanted them to overlap. I placed the stitch witchery in between the two fabrics, put a wet washcloth over the two fabrics and pressed down my iron.
You do need to hold your iron on each spot for at least 20 seconds each.
Some spots may need a little longer.

Next I flipped the two sacks (which are now seamed together) over and folded over the top to make a rod pocket. I had to place the stitch witchery where I wanted the rod pocket to end and iron again.

Hung a Simple Non-Decorative Rod and here we have it

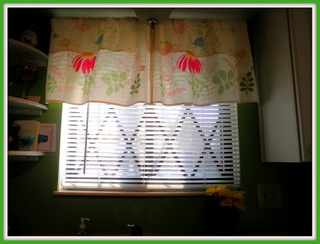
Now that it is all said and done, I wish I hadn't put the two towels together. Rather just let them hang on the rod, but you live, you learn, and you learn to roll.

I love the colors in the Flour Sacks. They just go perfectly with other accessories she already had.


Here is the rest of the Kitchen Makeover!


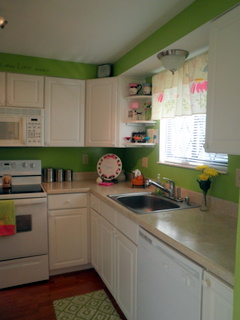
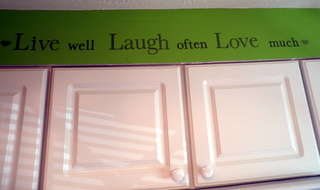
This saying was found at the DOLLAR STORE, yes you read that right, Vinyl letters at the Dollar Store. I had to get it, right! Great thing is, she had something else with the saying on it in here home already.
Do I know my sis or what!

Overall I think these towels were a perfect fit for her kitchen.
Way to go Momma for finding these flour sacks.

Hope this inspires you. Link up or tell me what you are going to do for your simple, No Sew project!

Photobucket

Linking up to:

Wednesday, April 20, 2011

So much on my Plate...

Do you ever feel like you have to much on your plate?
Like you are being pulled in a 1000 directions that just makes you end up spinning in circles?

Well I do, and sometimes quite often. I have work (part-time) which is sometimes quite with nothing to do so I can get other things done, and sometimes very overwhelming and  I feel bogged down. {Of course those busy days usually come when I have the most stuff to do} I am also a full-time mommy, wife, pastor's wife (at least soon-to-be pastor's wife, still, a church staffer) friend, baker, maid, bill payer and whatever else I can find. I love doing crafts and most often will choose to do those, sort of as my outlet, over cleaning, dishes, and laundry.

On top of all of this I try and do side projects for people to make a little extra money. My newest one is helping out a client of my mother's, whom is a real estate agent, in doing some work to help get their house on the market. Staging, shopping, suggestions, and whatever else is needed. I am painting some fixtures which is taking the most amount of time.

Now, I am not telling you all of this so you feel sorry for me or volunteer for help (because as most of my friends know, I have a hard time taking it anyways, kind of a control freak). I'm telling you all of this for a few reasons:
  1. It helps to get it all out there. To get all that overwhelming feeling out.
  2. It puts things into perspective. Helps me to realize that the problems that I face right now are nothing compared to what others have going on. In other countries and in ours.
  3. To let other moms know that they aren't alone. That these things/ times happen to all of us.
If you are like me and have these overwhelming times please be encouraged that there is help out there. Not just by asking for help but by having support. I have the loving support of my hubby, who I could not live without. I have support of friends and family that will help when I need (and are willing to give into my controlling-ness). Lastly, but most important, I have the support of my loving Father in Heaven. I can call on Him to take all my worry away and He does. I surrender it all to Him and it just floats away.

If you don't have the support that I do through a spouse or friends, let ME be that support. Comment here, message me on facebook, just get a hold of me and let me lift you up and encourage you.

If you don't know Jesus in the way I described, again, comment, message me, let me lead you to Him! There is no greater gift than a relationship with our Savior!

Well, I don't know about you, but I am feeling better already.....
Photobucket

Monday, April 18, 2011

Surprise {Room Makeover}

Here is the big project I have been working on, also with the reason I have not posted anything all weekend....

I am lucky enough to have only one sister/ sibling. Through the years we have not always gotten along (normal sibling stuff) but as we have grown older we have gotten closer. She only lives a 5 minute WALK away and loves being Auntie C to Boogs. My sister is an independent woman that has been through quite a bit in her life. Through all the choices of men that she has had (because as you can see, she is beautiful), she has never settled for less than what she deserves.

Well, to show my amazing love to her and to give her a place she can call her own, I decided that I was going to give her house a makeover for her Birthday. Starting Friday morning she took a girls trip to Nashville, TN, and we got started. With the help of my {words can't describe} husband and my wonderful parents, and the help of some really great friends, we worked, and worked and worked.


Working day and night with only a few breaks, we completed this makeover within 53 hours! 

And for the 1st time in her LIFE, she was completely surprised!

This was a big project, so more details to come.
Photobucket

Thursday, April 14, 2011

New Element

Hey All!

Wanted to let you all know about the new button that I added on my side bar. It is called Blogs I {Heart}

These are blogs that I check daily (or almost daily as time allows)

If you know of someone that has a blog, and you think it is great. Link it up at the bottom of this post. I am sure I will fall in love too. Can't wait to see all the new blogs that I need to add to my daily list.

Hugs,
Photobucket

Wednesday, April 13, 2011

Tierd Cake Plate

Ok, so let me start off by saying I'm sorry. I made this before I decided to start Mommy Makes Me and so I don't have tutorial pictures. If you would like to know exactly how to make it Joy's Hope has a great tutorial, and she uses Dollar Store products.

Throughout the years I have been crafty here and there but I aways did things I had seen others do or knew how to actually do. I didn't really try new things or if by some off chance I did try something new, I never completed it. If you are like me and would like to branch out, I encourage you to try this project.
IT IS SO EASY!!!!

I started off by shopping at Goodwill (one of my go-to stores for crafts) on 50% off everything day.
I purchased a total of 4 white plates (one textured set and one smooth set)
and 2 frosted crystal candlesticks.
* I made one for me and one for my girlfriend for her birthday

I primed and then painted the candlesticks and followed up with a clear coat (sealer)
because I used acrylic paint.  
{From experience, spray paint works better than acrylic paint or something you have to paint with a brush. Again, just showing you trial and error}

Lastly, I put a little bit of all purpose glue on one edge of the candlestick, pressed it on to the bottom plate and then put more glue on the opposite side of the candlestick and pressed the top plate onto it.
{Another side note, other blogs suggest not to do it this way because you don't get it exactly
even and I would agree. I had to make an adjustment on mine while the glue was still wet.
Made the bottom of the plate not look pretty but luckily you can't really see it.}

Final Product:


This one is my girlfriends. It just so happened we have the same color's in our house.


Better look at the whole thing.

I do encourage you all to try this. Let me know how your project goes.
Feel Free to Link Up your Household Project! 
Good Luck!


P.S. Don't forget to head over to Little Miss Momma and check out how to win the
giveaway from I Heart Nap Time

Comments Fixed

I want to apologize to anyone of my followers who have tried to post comments and haven't been able to. Or, have had to jump through a lot of hoops to do so. I believe I have corrected this problem so,

PLEASE, PLEASE, PLEASE, Leave comments! I want to hear what you have to say.

Please test this out and let me know if it is easier.

Thanks!

Tuesday, April 12, 2011

Inspirations {For when I get the time}


Hey All!

I don't know about you, but I LOVE checking out other blogs. I love to see what they are posting, what the new craze is, or just check out the people/ blogs that I have come to know and love!

I wanted to let you all know what is out there that is inspiring me. These are all things that I am either in the process of creating (yes I do get ideas from others) or want to when I find the time.

So, here it goes:


Another great Easter Themed Project that I could do with Boogs:

Now for some things for the house:
I totally want to get this vinyl wall decal from Wonderfully Wordy

This next one is something ANYONE can do! Can't wait to give it a try. I totally need new pillows.

Isn't this rug just Gorgeous! I can't wait. It is going to look so good under my kitchen table.

And lastly, a few things for me and my girlfriends:


Last but certainly not least, Little Miss Momma {One of the reasons I started blogging}

So, that's all for now (which is a lot of projects).

P.S. I have a large project that I am working on so be sure to stay tuned. Also, please forgive me if I don't get to post everyday. I will try but this is a large project and pretty much taking up all my time. However, I am super stoked to show you the final pics!


Monday, April 11, 2011

A Little Moment to make a Big Impact

So, I don't know about you, but I don't always take the time to stop
and take in what is happening around me.

Side Note: Years ago, don't know where or when, I learned a valuable lesson on how people work. They said, "There are 2 kinds of people. Ones that think, People First- Task Second. And then there are ones who say, Task First- People Second." I am one of those Task First kind of people. Now, that doesn't mean that I ignore people, it just means that I want to get done with the task-at- hand and then I will socialize and chit-chat with people. (And let me just tell you that my husband is a people first kind of person which is sometimes great and sometimes very frustrating as a task first kind of person. Love you Honey!)

Ok, so anyways, back to what I was saying. Since I am a Task First kind of person, I don't take the  
time to take things in around me because I am always onto the next thing that needs to get done.

Well, last night was different. My wonderful parents took Boogs (that's my Little Man's nickname that I gave him) and myself to a banquet dinner (Hubby was busy working so he couldn't join). It was a bunch of "older" people that my daddy worked with and he wanted to show off his grandson. Understandably! Since there was nothing there to do except enjoy the time with my parents and Boogs, that is what I did. And let me tell you.....

IT WAS GREAT!

We had dinner, chatted, and then...

The Party Started!

With no one else out on the dance floor, Boogs took it over.
Boogie-ing down! (haha pun intended)

Strutting his stuff

Breaking out the 80's moves

And raising the roof!

Finally, he made Nana's night and danced with her.
(Look at that thumb up, who taught him how to dance, Lol!)

Then we had to take a little dessert break with Papa.
Look at the mischievous look on his face, those boys are always up to something.

A wonderful night that I will always remember. I so cherish this time I get with Boogs.
He knows he can't grow up, right?

Thursday, April 7, 2011

Spring Time

Spring is Here!

And in this house, we are super excited. Means leaving the doors and windows open, letting the fresh air in and the best part, no BUGS yet! To really get me in the spirit of Spring I decided to make a new wreath. I normally only have a wreath on my front door at Christmas but I thought, it's time for a change. So, here it goes....

I started out by picking up a wreath at Goodwill for $2.50 (Marked $5 but I only buy on 50% off days)

As you can see, very ugly.
 So I ripped all the ugly branches off and just started with a plain vine wreath.

Then I needed to pick up some supplies:
Ribbon (on Clearance at Michael's for $1), Green Moss, and White bead branches (both from the Dollar Store)
Oh, and I used wire cutters and a hot glue gun which I already had on hand.
(which all crafters should have on hand)

I started by gluing the start of the ribbon on the back of the wreath. Then spacing out the ribbon, I wrapped it around the wreath.
Then glued the end of ribbon onto the wreath. Looking better already!

Next, using no real technique at all, I put a little glue, then a little moss. More glue, more moss.
MORE GLUE, MORE MOSS!!
Oh sorry, got a little carried away there.

WARNING:
 You will get moss EVERYWHERE. My husband looked at my workspace afterwards and said,
 "Didn't you say you put moss on the wreath, looks like it's all on the floor."

Now it was time for the pretty white bead branches.
I used a wire cutter and cut about 2 inches below where the beads ended. I wanted to have enough room to add lots of glue so that I knew they would stay put.  So, I added glue to the bottom of the stem and placed it inside the vine. It was a pretty random process placing them in the wreath.
Voila!

The last thing I did was made a rosette for the wreath. I will have to show you how to do that on another blog because I have to see if I can make it again. It was late at night, wanted to get to bed and put something together. After many, many trial and errors.

So, Here is Spring at our House!
I am in Love!

I will probably add a ribbon to cover up my wreath hanger but it is clear so it's not so bad.


I hope this inspires you to bring Spring into your home.

Let me know about your projects!

Tuesday, April 5, 2011

Intro to Mommy Makes Me...

HELLO ALL!

I am new to this whole world of blogging so please go easy on me.

I wanted to start this blog in order to inspire other to reach out and try something new. With the help of a few really great women in my life, they have given me the courage to break out and try something new. Most would say, "that isn't a big deal". But it is for me because I am doing it with something that I don't typically have when trying something new......
CONFIDENCE!

I know I am not the best at a lot of things, maybe even at a few things, but I am willing to stretch myself and at least give it a try. And I want to encourage others to do the same.

Lets face it, we are all moms (and although I am a first time mommy, and others may not be now, they were at one point) trying our best. Learning from the mistakes our parents made, gathering support where we can, trying to do the best Life allows.

I know the support that I have from my amazing husband, parents and in-laws, friends, church family, and God are more than I feel I deserve. Reality is, that is more than most people DO have. I want to be that support. That shining light to help you get through those hard times and the one to laugh/ cry (which I do a lot) during the great times. Along the way I will be sharing stories of my life, my family, my faith, and some great crafty things to help inspire.

I look forward to learning and sharing with you, and hope you will do the same too!